Sunday, 12 September 2010

Flower 3

September 12, 2010

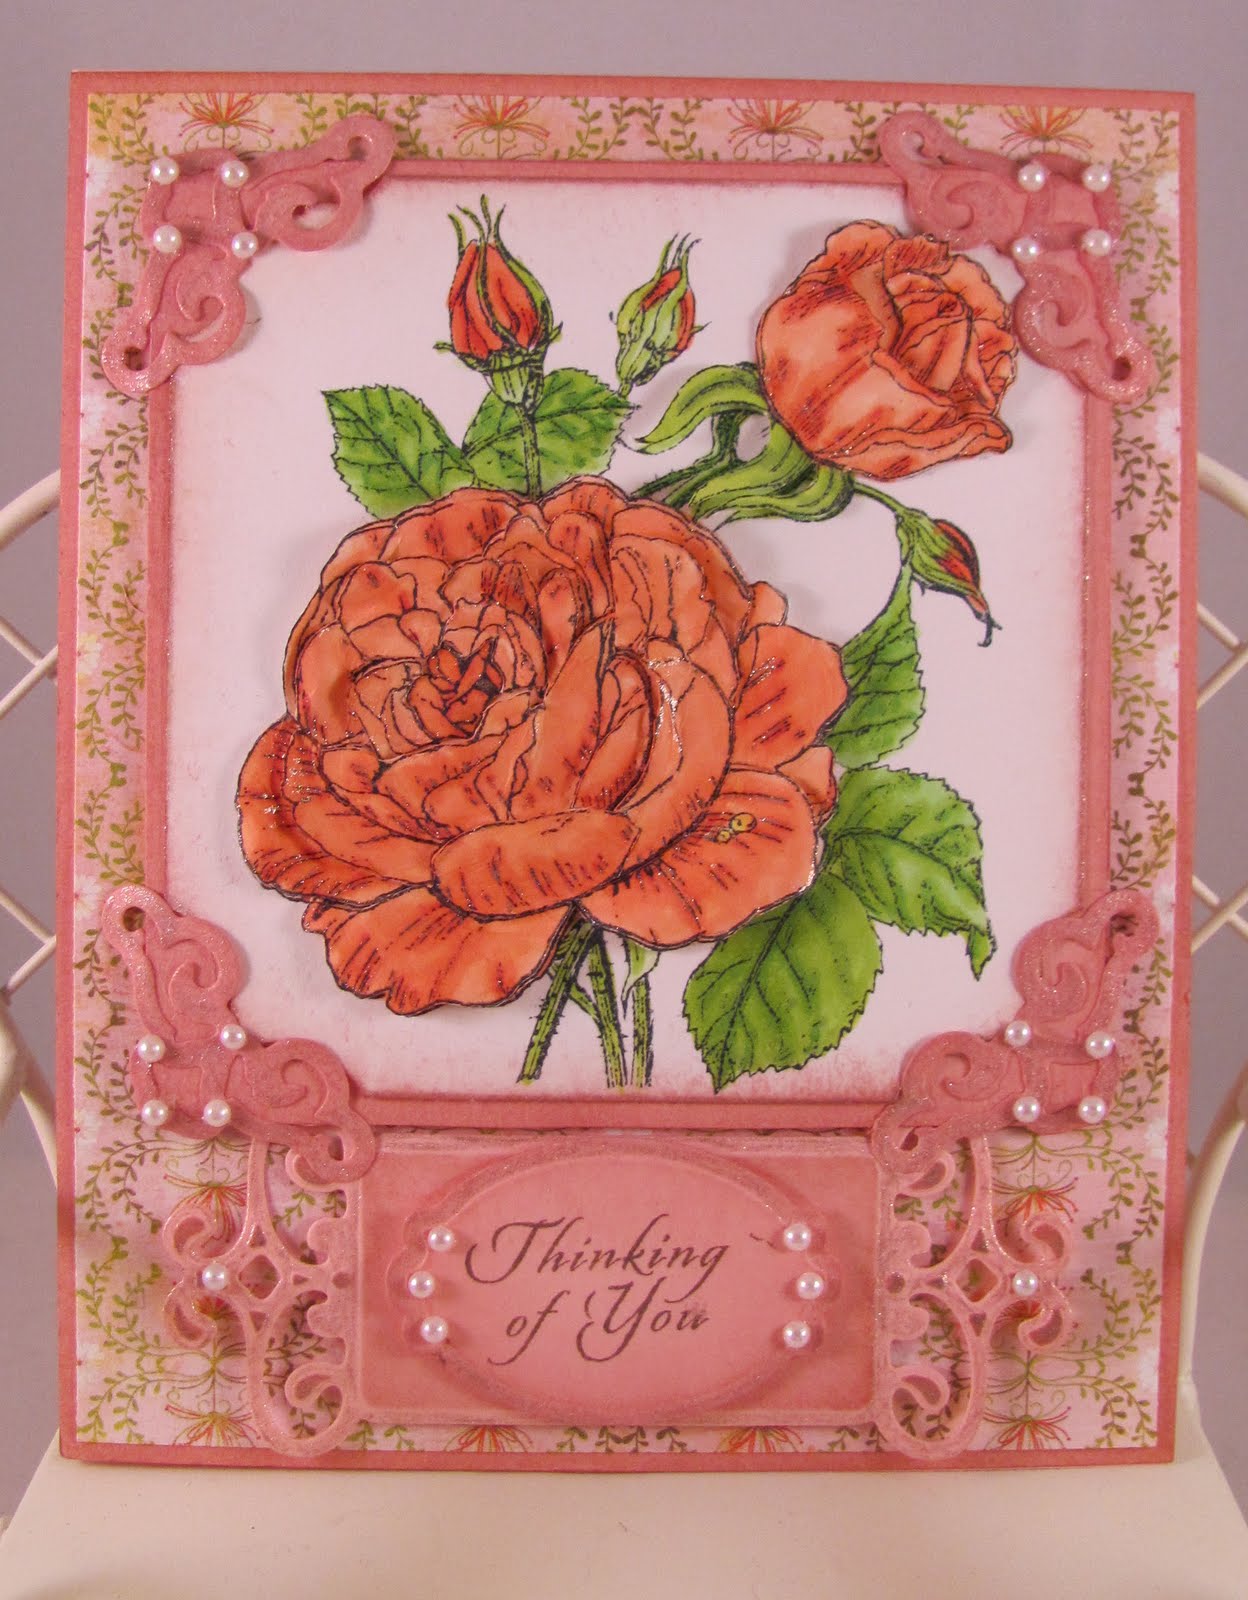
Here is the 3rd flower I am featuring in my Flower card series. The flower image is another recent release by Crafty Secrets Clear Art Stamp called "Roses"

Image of the Rose was stamped 3 times on white cardstock and colored with Copic markers. The layers were made by cutting 2 of the different stamped images in specific places to achieve the dimension for the roses. The cut edges were slightly curved with tweezers to give the added lift to the rose. Clear Star Sakura pen was used along the creases in the rose and edges to give it the sparkle.


This the full picture of the card.


This is a close-up picture of the rose. Here you can see the dimension that was achieved by the different layers and curving the edges.


Here is the entire stamp set that also includes sentiments and a lady bug.

Tomorrow I will feature the last of the Flower series which is the Sunflower.

Have a wonderful week ahead.

Sunday, 5 September 2010

Flower 2

September 5, 2010

Here is another card using one of the new Flower stamps sets of Crafty Secrets - Dahlia. I really love this new sets that Sandy came out with. By layering the flowers you get so much dimension and it is so fun to work with.

Image was stamped 5x with Black Memento Ink and colored with copics and cut at various parts of the image to make the different layers. Edges of the petals were curled to give extra dimension.


Here is a side view close-up picture and you can just see the different layers that give this image so much dimension.


Here is what the whole set looks like.


Within the next few days I will share another card made using another of the flowers sets. There are 2 more that are just as fun to work with.

Hope you all are enjoying this Labor Day weekend.

Tuesday, 31 August 2010

Flowers

August 31, 2010

Just a quick post for today. I just want to share with you a card that I made using the Poppy Stamp set of Crafty Secrets.


Image was stamped 3x on white cs with Momento Black ink and colored with Copics. 2 of the stamped images were cut and raised on top of the original image for dimension.


You can see the layers in this photo.


Here is a closer look at the card.

This is what is included in the whole stamp set.

Monday, 23 August 2010

August New Product DT Challenge

August 23, 2010

It is time for another Crafty Secrets DT Challenge featuring a new product. For this challenge my main project is done by using the Double Sided Christmas Creative Scraps. Some time ago Crafty Secrets/Heartwarming Vintage came out with their Creative Scarps which were one sided. Sandy, owner of Crafty Secrets recently decided to re-produce these Creative Scraps and make them double sided. They are so great to use in cards, mini albums, wall hangings, ornaments and the list goes on and on. You simply can use just the front side, back side or both sides. And what is so nice about them is that when you cut the image on one side the back side has a matching image in exactly the same size.

My project for today is a Holiday Planner. We all know just how stressful it can be to get everything organized for the Holiday Season. Yes, Christmas is just 4 months away and it is time to start getting all the different lists together to make thing go by as smoothly as possible. And a Holiday Planner is one way to get things all organized.

I used the Wood Clipboard Album of Crafty Secrets for this Holiday Planner and covered the front with the back side of the Christmas Creative Scraps. I colored some of the images with chalk to make them stand out and also used some Glossy Accents on the berries. Cut out some different sizes of poinsettias using the Poinsettia die from Spellbinders, outlined the edges with a gold leaving pen and for the center of the flower used gold glass beads. For the leaves, I dry embossed them with a leaf clay mold to bring out the veins on the leaf then distressed it with a green distressing ink. The title was die cut with the labels 4 Nestabilities from Spellbinders and letters are made with Adore Clear Art stamps which is also from Crafty Secrets. Edges were distressed with Vintage Photo distressing ink.


There are 4 inner pages which are lined so that you can easily list down different list to help you get organized.
Images that are used for the different pages are from the front portion of the Christmas Creative Scraps.

Christmas Card List

Gift List

To Do List


Notes

Second project for this DT Challenge is a card using a stamp from the Bathing Beauty Stamp Set. Main image was stamped on a frame from the Classic Paper Pad and colored with Copic Markers. Edges were distressed with Vintage Photo distressing ink. Second image from the same stamp set was stamped on cream colored cs and colored with Copics. To finish the card off I added some ribbon, sea shells and clear glitter on the words from the background paper "DREAM".


Through out this week keep coming back as I will feature more projects using other new products from Crafty Secrets.

For now, it is time to hop on to the rest of the Design Team Members, as I am sure they have exciting projects to share with you today.


And don't forget to check out the Heartwarming Vintage Blog and Crafty Secrets site to check up to date with the latest news and products.

Enjoy your day.

Marisa

Wednesday, 4 August 2010

Glamour Girls Note Case

August 4th, 2010

Here's another project that I worked on recently. This time I am using the double side Girlfriends Creative Scraps. Sandy, owner of Crafty Secrets Heartwarming Vintage has done a great job putting double sided Creative Scraps together. Front and back images on the sheet were carefully matched so that when you cut the image in the front that you like, the back has a complimentary image in the same size. Perfect for creating hanging ornaments were you would like to showcase both front and back.

For this project, I took an inexpensive case (box) from a dollar store and covered it with the sheet using the back side of the paper. Some of the beige toned images were colored with a light colored copic marker to bring out the beauty of the image. I simply added some ribbon and pompoms to the outside edges. All around the sides I used some "Class a Peel" gold strip stickers to outline the case. When you open up the case, it holds a set of Girly Birthday Note cards. The case is perfect to give as a gift to a special friend.


This is what the front of the case looks like.


These are the 2 different side panels of the case. I just limply cut out more images from the sheet and pop it on the sides.


Here is the front again when it is open. Take a look at what is inside of the case. Some matching Birthday  Note Cards. Perfect way of storing your small size cards.


And here is a picture of the 3 different styles of cards that come in the case. These were made from images found in the front part of the sheets. These images come in so handy especially when you want to make a quick vintagey yet adorable card.

Beach Time Card

August 4th, 2010

Time to show you are card made with one of the newest stamp set just recently released by Crafty Secrets called Bathing Beauties.


I used copic markers to color in the stamped image and DP is also from Crafty Secrets.

 Take a look at the entire stamp set and you will be amazed at all the great vintage images you can use for cards, layouts and other crafting projects.


Monday, 19 July 2010

Crafty Secrets DT NEW CHA Product Challenge

July 19th, 2010

Good Morning everyone. Hope you are all starting the day with lots of sun and warm weather.

Today, the Design Team of Crafty Secrets has lots of new products to share with you. We are holding a challenge featuring some of the new products that were recently released.

My main project for today is an Artist Supply Bag. I spotted this wooden bag in the clearance section of Michael's and thought that is would make a perfect bag to hold some of my art supplies and at the same time use the Art Supply stamp set of Crafty Secrets. I started this project by first crumpling up a Manila File folder and then lightly passing some Vintage Photo Distressing Ink over the creases. Then I ironed out the paper and distressed it further with Spiced Marmalade, Broken China and Peeled Paint distressing ink. Similar colors to the tag that I posted a while back. In fact this is a bag to go hand in hand with that tag. Then I started stamping the different stamp images from the Art Supply stamp set. Once I was done I coated the top of the wooden box with Clear Glossy Accents. I let that completely dry up and while waiting I continued distressing the other sides of the box. I then assembled the different sides of the box, added some Prima Flowers, Class A Peel stickers for the edges, leaves from the Vine borderabilities of Spellbinders.

 Here is a close-up of the box. I also used the Classic Lace Border Grand for the bottom edges of the box and added some half pearls.

 
This is a tag that I made using one of the stamps and Labels 10 nestabilities from Spellbinders. I used a shiny gold cardstock for the frame.


Added some Art supplies for the finished product.


Next projects are hanging frames that I made using the Birds and Blossoms Creative Scraps. The frames are from the Sweet Chips chipboard frames. For the first one I coated the top with a Gold Leafing Pen, added some gold half pearls and a sweet image from the Birds and Blossoms Creative scraps. I coated the top of the image with some Crackle Glossy Accents. The top ornamental leaves is from the Vintage Findings pieces.


Next hanging frame uses another Sweet Chips frame and image from the Birds and Blossoms Creative scraps. I used copic marker to paint the frame and coated it with Glossy accents and then some Class A Peel stickers. Image was also coated with Glossy Accents. Rose flower and leaves were added for accents.


Next project are some cards that I made using more images from the Birds and Blossoms Creative Scarps. For the first card I adhered double sided tape on the top of the image and added some Clear Ultra fine glitter from Gitter Ritz, then burnished it to bring out the shine of the glitter. DP is Basic Grey.  Flower was made using cotton material that was cut 1 inch wide and then twisted and folded around a round cardboard. Leaves are from the On the Vine Border Grand from Spellbinders.


For this next card I adhered the double sided tape on top of the chipboard frame and added some yellow glitter. Then I burnished the glitter to bring out the shine then coated it with New Leaf Copic markers to match the DP the I was using. DP is Basic Greys June Bug and Urban Prairie. Bird image is once more from the Birds and Blossoms Creative Scrap. Buttons and ribbon were used to finish up the card. the card sketch was taken from this weekends sketch over at CPS.


This next card uses stamps from the Birdies at Home stamp set. Stamped the images onto vellum with Onyx Black Versafine ink. Then I colored the back of the vellum with Copic markers and added some half pearls to the front of the cage. Vellum, brown metallic cardstock were cut using the Labels 10 nestabilities from Spellbinders. DP is Basic Greys Cappella. Added Ribbon and more half pearls to finish off the card.


My last project is another note pad using the Office 101 stamp set. Covered the note pad with paper from Basic Grey and distressed the edges with Vintage Photo distressing ink. Stamped some images from the Office 101. Used Martha Stewarts Embroidered Floral border punch to make the strips of blue paper and added some ribbon in between the slits.


Well thank you for taking the time to look at the projects that I created for today's DT challenge. Now it is time to hop over to the blogs of the rest of the Design Team. I am sure they have special projects to share with you today:

Vicki Chrisman
Linda Duke
Pam Hooten
Michele Kovack
Melissa Phillips
Flo from France
Julie Campbell
Deborah March

For more news and updates to all the products that are coming out soon, please go to the Crafty Secrets site and Heartwarming Vintage Blog.

Have a wonderful day.
Marisa
Thursday, 8 July 2010

Office 101 Note Pad

July 8, 2010

Just a quick post today to share with you a note pad that I made using the Office 101 Stamp Set from Crafty Secrets. I got the note pad from Value Village and thought that it was perfect to use with these Stamps. I simply cut my DP from Basic Grey 3-1/4 by 11-3/4 then scored it at 3/4, 1-1/2, 6-3/4, 7 to match the original line of the cover of the note pad. Distressed the edges with Brick Red and Black Soot Distressing Ink and Stamp my images from Office 101 with Black Soot.

Have a sun filled beautiful day.

Monday, 5 July 2010

Art Studio Tag

July 5th, 2010

First of all, I hope that everyone had a safe and wonderful 4th of July.

For today's post I have made a tag using one of the latest stamps that was released by Crafty Secrets - Art Studio. This is a large stamp set with 24 separate stamp images. Perfect for the artist in all of us.


The shipping tag was distressed using Spiced, Blue China and Vintage Photo distressing ink. The stamped images were stamped using Black Soot Distressing Ink. After all the images were stamped I added some Crackle Accents and let it dry. Below you will see the effect in a close-up picture. To finish the tag off I added some bling and ribbon.


Hope you all have an enjoyable evening.

Monday, 21 June 2010

Crafty Secrets DT Technique Challenge

June 21, 2010


It is time for another Crafty Secrets Design Team challenge. For this month we are focusing on techniques. Today \i will share with you a technique that I saw being used in someones blog. I am not sure who's blog featured this technique but when I saw it I knew right away that I wanted to try it out with the Vintage Postcard kit of Crafty Secrets.

This technique is a 3D Pyramid Layered Image and it uses one of the 6 images that you can find in the Beat Buds Vintage Postcard Kit as seen in the picture below ... I used the bottom image for my project.
 I first cut all around the image and 2 of the smaller pieces that come with the set.

Then I used the Labels 4 nestabilities from Spellbinders to cut out the different layers of the pyramid. For this I just used one image. You can also use 6 different copies of the same image to make your layers. I was trying to be thrifty and decided to try it out with one only. I also cut out the the same layers in full using a cream colored cs so that I could adhere the different layers of the image on it. This is how it looks combined with the cs.

Once that was done, I embossed each layer with the spellbinders Labels 4 die, distressed the edges with Vintage Photo distressing ink and then proceeded to layer them one on top of the other. This is what it looks like after doing that.


You can see how the layers look when they are stacked one on top of another pyramid style. The bottom layers was adhered to the chipboard piece that comes in the kit. I then used a file to remove the excess piece from the bottom layer and decorate the top with glitter, some cut out stamped butterflies (this stamps also comes in the kit), 2 embellishment images (also from the kit), gold leafing pen for the bottom edges and ribbon. For the backside of the postcard, I used more stamps from the kit and distressed the edges with Vintage Photo distressing ink. All this can be seen in the next few photos...


This is how the finish project looks like front and back when it was all finished.
  
 
 I also added a glass hanging ornament that you can find in the Vintage Findings package.


 Time to take a look that what the rest of the Design Team have to share with you today. Please take a moment to click on each of them below and it will link directly to their respective blogs...

Vicki Chrisman - DT Leader
Marisa Grosson - that's me ---- you're here

Lastly, don't forget to keep up-to-date on the latest news that Sandy shares in the Heartwarming Vintage Blog and the Crafty Secrets site.

Enjoy the day,

Marisa

Wednesday, 9 June 2010

Felicitation

June 9, 2010

There are so many new stamp sets that Crafty Secrets has come out with lately. One of them is the "Bonjour Merci" stamp set which I have used for my card today.

This card was made for 2 challenges happening over at Splitcoast Stampers. The first one is Darlene's Tuesday Crafty Secrets Forum challenge to use something old, new and borrowed in your creation and also for the Wednesday Sketch Challenge.


I stamped the pretty image of the girl holding a bouquet of flowers with Tuxedo Black Memento ink on white cs and colored it with various Copic markers. Then the sentiment was stamp above the main image. Cut the image using the oval Coluzzle template. Then matted the oval with a green designer paper from the "Home" Photo Mats from My Mind's Eye using the large Oval Scallop die from Spellbinders. All the designer paper used for this card is from the same collection of My Mind's Eye. For the center panel I used the Shell border punch from Martha Stewart the added lacey ribbon, half pearls and a scrunched up flower that I die cut using the Flower Creations die from Spellbinders.

To go with the theme of the Crafty Secrets Forum challenge:

Something old - used an old lacey ribbon that I had in my stash for a while now
Something new - the just released "Bonjour Merci" stamp set from Crafty Secrets
Something borrowed - a technique I found in Sherry Cheever's and Linda Duke's blog on scrunching up die-cut paper flowers by spraying it with Glimmer Mist and scrunching the flower up until it dries (with the help of a heat gun)


Here is a close-up shot of the flower. I held all the pieces of the flower together with a yellow brad and then used glue on top of the brad and sprinkled some glass beads over it.

Hope you all are enjoying your evening.

Marisa

Wednesday, 2 June 2010

Domestic Goddess Creative Scrap

June 2, 2010

This card was made for the Tuesday Crafty Secrets Forum challenge over at Splitcoast Stampers. Host for the challenge is Lori Lynn and she has asked that we use use cardstock, recycle a paper bag or use kraft colored dp for our project. Sketch for the layout of the card is taken from today's Sketch Challenge which is also featured at Splitcoast Stampers.

I used kraft colored cs for the base of the card and all the images on the card are from the Domestic Goddess Creative Scraps from Crafty Secrets. These easy to use sheet of images now come printed double sided and are so versatile in any crafting project. DP around the main image is from the Earthy Paper Designs of Crafty Secrets. I used a Martha Steward border punch for the matting of the center strip behind the images with the aprons.