Thursday 30 October 2008

Merry Christmas

Octobeer 30, 2008

Here is a card made for the Ways to Use It Technique over at Splitcoast Stampers. Today technique is to use cracking in project.

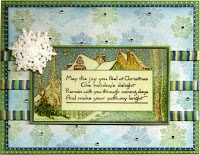
For this card I used the Vintage Stamp Set from Crafty Secrets Clear Art Stamps. The image was stamped on white cs with Onyx Black Versafine. Used a tiny sponged tip applicator to sponge Galaxy Gold and Moonlight White on the image. I then stippled Walnut stain around the image and then sponge the very edges of the panel with the same ink. Stamped a Holly leaves on a separate cs and colored it with green and red Tombow markers. Cut the holly leaf out and adhered it to the top of Santa. I then applied Versamark to the top of the panel and heat embossed it 3x with Clear UTEE. After the UTEE cooled down I then bent the panel to form the cracks. This was matted onto dark green DP then on to burgandy DP. Background paper from the Pastel Paper Design collection of Crafty Secrets was distressed on the edges with Walnut Stain and then I randomly stamped the flourished from the same stamp set with Lightning Black. Adhered a strip of burgandy DP and the star DP from 'tis the season collection of studio 8 paper company. Most of the layers were edged with Gold Gel Pen. Used Peel Offs for my sentiment. The whole card layer was matted on to burgandy DP.
Stamp: Vintage Christmas
Paper: Pastel Paper Design and 'tis the season collection
Ink: Onyx Black Versafine, Walnut Stain, Galaxy Gold, Moonlight White and green and red Tombow markers
Accessories: UTEE

Wednesday 29 October 2008

Hello

October 29, 2008


For today sketch challenge at Splitcoast Stampers, I used stamps from the Glamour Girl stamp set of Crefty Secrets Clear Art stamps. The stamps were just perfect for the sketch. Each of the 3 images was stamped on white cs with Onyx Black Versafine. Cut into a square then matted onto red cs. Used DP form the Radiant Paper Designs of Crafty Secrets for the background. Then stamps the corner stamp and sentiment which came from the same stamp set. Pretty simple card.


Stamps: Glamour Girls Crafty Secrets Clear Art Stamps
Paper: Radiant Paper Designs
Ink: Onyx Black Versafine

Tuesday 28 October 2008

Snow Bunnies is Here

October 28, 2008

Crafty Secrets new stamp sets (Snow Bunnies and Christmas Joy)has just arrived and are available starting today, October 28th. Here are a few cards I made using the new Snow Bunnies set.

This first card was made by stamping the images on white cs with Onyx Black Versafine. Images were then colored with different colors of Copic markers and each one was cut with scissors. Used Aleene's glitter snow to make the bottom part of the snow scene and marked the hills with gray Tombow marker. Clouds were then made using a oval scalloped shape and sponge with Peacock ink pad. Mounted the images on top of the snow. Sentiment was stamped on a white round cs and the edges were slightly distressed with Peacock. Used a snowflake punch to border the sentiment by cutting the tips of the snowflake and gluing it around the circle. Then the whole scene was matted on to blue cs.

For this next card, I again stamped the image on white cs with Onyx Black Versafine and colored the images with various Tombow markers. Added some glitter underneath the image for a snow effect. Distressed the edge of the white cs by sponging with peacock ink. Cut the frame around the image with light blue cs using one of the Tri-fold card cuts found in the Joys of the Season set from Cricut. Stamped the frame with the small snowflakes from the Snow Bunnies stamp set. Matted this on white, green and blue cs. Again the white cs mat layer was sponged with peacock ink.

For the third card, I again stamped the image on white cs with Onyx Black Versafine and colored the images with Tombow markers. Used glitter on the bottom on the image for a snow effect. Cut the white cs at a diamond angle and distress the edges by sponging with peacock ink. This was then matted on a blue cs that was die cut with a square scallop nestabilities. Behind that I used the snowflake embossing folder from Cuttlebug for the white cs. Lightly passed the peacock ink pad on the raised portion of the embossed snowflakes. Sprayed it with Patina Glimmer mist. Then added white brads to the 4 corners and pierced each scallop with a piercing tool. This was then matted on to the blue and white cs.


Here is yet another card made using this set. This card was made for the Tuesday Crafty Secret Forum challenge over at Splitcoast Stampers.

Check out the Heartwarming Vintage blog for more updates and samples using this fun Snow Bunnies Stamp Set. The Christmas Joy stamp set has just arrived, so stay tuned and check often to see what project our Design Team members will create.

Sunday 26 October 2008

Magical

October 26, 2008

This weeks featured stamper over at Splitcoast Gallery is Kay (SpeedyStamper). You may want to check her gallery out. Kay is a terrific stamper.

Stamped images used for this challenge is from the Fairies stamp set of Crafty Secrets Clear Art Stamps. Images were stamped on vellumn with Walnut Stain Distress Ink. Vellumn was matted on a designer paper from the Radiant Paper Designs from Heartwarming Vintage Collection. Further mounted on beige then brown cs. Added piercing on the ends of the brown and beige cs. Then this was then glued on to another DP from Heartwarming Vintage Collection, this time from the Earthy Paper Designs. On this DP I added the star stamps which was stamped with Walnut Stain and then I distress the edges of the DP with Creamy Brown. Distressed a rectagular chipboard with creamy brown and chocolate chip inks and cut some slits on the edges to run the ribbon through. Sentiment from the Fairies stamp set was stamped with Walnut Stain. Lastly, I added 3 star brads on each side of the vellumn panel.


Stamps: Fairies Crafty Secrets Clear Art stamps
Paper: Earthy and Radiant Paper Designs and beige and brown cs
Ink: Walnuts Stain Distress Ink and Cready Brown
Accessories: Chipboard, brads and ribbon

Friday 24 October 2008

Life's Little Things

October 24, 2008

Here is a late posting for the card I made for Wednesday's sketch challenge over at Splitcoast Stampers.

Image was stamped on white cs with Onyx Black Versafine then colored with 2 shades of pink and green Tombo markers. Mounted the rectagle piece on pink them black cs. Used BasicGrey's Euphoria DP for the background panels which I matted with black, pink and then black again. Stamped the sentiment from StampinUp onto pick cs with Onyx Black Versafine. For all the black layers I added dots with a pink Souffle pen. Added a brad from BasicGrey to the corner of the sentiment panel and some holes to the top corner of the main image panel.

Stamp: Botanicals from Inkadinkadoo, Happy Harmony from Stampin Up
Paper: Euphoria from Basic Grey, black and pink cs
Ink: Onyx Black Versafine, pink and green Tombow markers
Accessories: brad from BasicGrey

Tuesday 21 October 2008

Mommy, Hold Me

October 21, 2008

Well, this week is Pink Week over at Splicoast Stampers to tie in with October's Breast Cancer Awareness Month.

Today's Color Challenge is to use Pink Pirouette (Pretty in Pink), Kiwi Kiss (Old Olive) and Chocolate Chip. Card I made today in entitled "Mommy, Hold Me". When we are happy, sad, unsure or feeling that we need someone to hold our hand and guide us through the happy and sad moments in life, there is no better person that your mom to reach out to. The flower image for this card is made with 2 stamps. I used the stem and leaves from the Flourish Flower stamp of Hero Arts and the Rose stamp from Inkadinkadoo. These were both stamped on white cs with Onyx Black Versafine. Rose was colored with 2 shades of pink Tombow markers and the leaf was colored with Old Olive ink using an aqua color brush. Cut the oval shape around the flower with an oval coluzzle and matted that on a pink oval cs then on to a chocolate chip scalloped oval cs. On each of the scallops I added some pink liquid pearls. I also distress the white oval edges by sponging with chocolate chip ink. I set this layers aside for the liquid pearls to dry out. In the meantime I cut the background layers of my card. Chocolate chip cs for the base of the card, then glue on top the pink cs from Basic Grey's Sugared, then another piece of chocolate chip cs and finally the DP of roses from the Sugared pad of Basic Grey. The edges of the lighter layers were distressed by sponging chocolate chip ink just on the very edge of the cs. I added some dots on the Chocolate chip layers with a Pink Souffle pen. And finally, used a sticker for the sentiment.


Stamps: Flourish Flower, Hero Arts and Rose from Inkadinkadoo
Paper: Sugared from Basic Grey, chocolate chip and white cs
Ink: Chocolate Chip, Onyx Black Versafine, Old Olive, Pink Souffle pen and 2 shades of Pink Tombow markers
Accessories: Pink Liquid pearls and sticker

Monday 20 October 2008

Believe in Pink

October 20, 2008

Well I decided to make another card for our Design Team Challenge -to use stamps from the Support the Girls Stamp Set and the Splitcoast Monday Technique Lovers Challenge to use watercolor pencils and Twinkling H2O.

For this card I randomly stamped on the pink DP from The Sasha Paper Collection of Prima the image of the lady with Rose Romance. I then matted the DP on black cs then gold cs. I used some Peel-Offs Outline Stickers (Daisy in Frame) on white cs and painted the flowers with pink and green watercolor pencil and used the Cherry Sorbet Twinkling H2O over the colored pencils. Each of the 4 flower frames were mounted on black cs. For the center sentiment I stamped the words from the Support the Girls stamp set on white cs and then embossed it with clear embossing powder. This was then outlined with gold sticker and mounted on black cs. Added some gold dots all around the black outer matting with gold metallic get pen.


Stamps: Support the Girls Crafty Secrets Clear Art Stamp
Ink: Black Soot, Rose Romance, Twinkling H2O, water color pencils
Paper: The Sasha Paper Collection and black and gold cs
Accessories: Outline stickers, clear embossing powder.

Our Crafty Secrets DT Challenge

October 20, 2008

In keeping up with Breast Cancer Awareness month, out design Team Leader Vicki Chrisman, has challenge us to create something with that theme in mind. We are to use the "Support the Girls" stamp set from Crafty Secrets Clear Art Stamp or the Girlfriends Images and Journal Notes or both. This stamp set was designed to help raise funds for the Susan Koman foundation for breast cancer research and Crafty Secrets is donating $1.00 for every set ordered.

For this challenge I made a card using an image for the Girlfriends Images and Journal Notes and also used the Breast Cancer Ribbon stamp from the Support the Girls stamp set. The image was mounted on to a Purely Promegranate cs. Used the Martha Stewart Lace Border punch to cut the cs mat. This was them mounted on to my BG designer paper manufactured by K&Company from the line of Brenda Walton - Chelsea Pink Flat Paper. I sprayed Glimmer Mist's Tattered Rose all over the layers of my card and sponged the edges with Purely Pomegranate and Walnut Stain to distress the paper. I also cut out some flowers from the dp and added it on to the corners of the image panel and topped it off with liquid embossing. Stamped the Breast Cancer ribbon stamp onto my dp, cut it out and added some liquid embossing. This along with some ribbon was added to the left side of the card. Used a Gold mettalic gel pen to the enges of all the layers of the card to further distress the look of the card.

Do check out the blogs of our other Design Team Members. They have created more projects using stamps or images from Crafty Secrets.

Stamps: Support the Girls Crafty Secrets Clear Art Stamps
Paper: Chelsea Pink Flat - K&Company - Brenda Walton line
Ink: Purely Promegranate and Walnut Stain
Accessories: Martha Stewart Lace punch border, ribbon, Sepia Liquid embossing

Friday 17 October 2008

Thanks

October 18, 2008

This card was made for the Saturday Inspiration Challenge. Today's inspiration comes from the Etsy Store of San Francisco's artist Joom.

Stamped images from Inkadinkado were stamped on beige cs with Vintage Sepis Versafine. Then went over the image with a clear Gel pen to give a shine. Distressed the edges of the cs with a distressing tool and then made holes all alond the side and used a brown fine liner to make faux stitching. The edges were further distress with Walnut Stain Distress ink. Main image was then mounted on to designer paper from SEI - Madera Island. Just love this paper. Stamped 'Thanks' to the bottom right of the main image.

Stamps: Inkadinkado
Paper: Medera Island - SEI and beige cs
Ink: Vintage Sepia Versafine and Walnut Stain Distress Ink

Hallowe'en Joys

October 17, 2008

With Halloween just around the corner, here is another Halloween Card Treat. For this card I used an image from the Halloween Time Heartwarming Vintage Cuts, which I matted in orange followed by black. DP behind the image is from Haunted Twilight of Reminisce. For the border and corner of the orange cs I used stamps from the Halloween Fun stamp set of Crafty Secrets. I finished off the card with some ribbon.

Stamps: Halloween Fun Crafty Secrets Clear Art Stamps
Paper: Haunted Twilight - Reminisce
Ink: Onyx Black Versafine
Accessories: ribbon

Crafty Secrets Blog Candy

October 17, 2008

Check out the Heartwarming Vintage blog, Sandy has 2 free giveaways. All you have to do is leave a comment and you could be 1 of 2 winners. Great stuff that she is giving away. And you could be one of the first to receive the 2 new sets of stamps that will soon be available. Hurry on, you have until Sundy, October 19th for this chance to be a winner.

Have a joyful weekend, everyone.

Marisa

Free Blog Candy

October 16, 2008

Check this out for a chance to win some beautiful stuff.

Wednesday 15 October 2008

Seasons Greetings

October 15, 2008

This card was made for today's sketch challenge over at Splitcoast Stampers. Stamped the poinsettias 2x with Onyx Black Versafine on white cs. Colored the image with Red Tombow marker and cut the flowers with scissors. Added some liquid embossing and set aside to dry completely. Back ground paper is from the Falala Holiday collection of makingmemories. Background DP is from Geometric Falala which was cut 4-1/8 x 5-3/8". Red matting behind this was the reverse of Poinsettia Stripe Falala DP. Used Poinsettia Stripe Falala for the bottom strip of DP across the card. Scalloped circle just in fromt of the background paper was cut with a round scallop nestabilities. Center circle is a cream cs that was cut with a circle cutter then sprayed with Meadow Green Glimmer Mist. Sentiment from the Vintage Christmas stamp set of Crafty Secrets was stamped on the cream circle by bending the clear stamp to form an arch using the circle cs as a guide. S was stamped on a separate piece of cream cs then cut and mounted with double sided foam tape. Once the liquid embossing on the poinsettia dried it was mounted on the cream center circle and added some poisettia leaves (from Holly Beery House) underneath the flowers. Center circle was then glued to the green scalloped circle. Assembled the different layers as seen.

Stamps: Holiday Calligraphies by Paper Inspirations, sentiment from Vintage Christmas by Crafty Secrets and leaves from Holly Berry House
Ink: Onyx Black Versafine and red Tombow marker
Paper: Geometric Falala, Poinsettia Stripe Falala - makingmemories and cream cs
Accessories: Liquid embossing, Meadow Green Glimmer Mist, round scallop nestabilities and circle cutter

Tuesday 14 October 2008

Penny Black Christmas Cards

October 14, 2008

Here are 2 more Christmas cards made over the last few days using stamps from Penny Black 'Christmas Critter' stamp set.

Stamped Images were colored in with Copic markers.
Stamps: Christmas Critter - Penny Black
Ink: Black Soot Distress Ink and various Copic markers
Paper: DCWV Christmas Paper pack and Holiday Joy Mini Dots from Paper Heart, red, white and aqua cs
Accessories: button, brad, Cuttlebug Embossin folder, snowflake punch and lace border punch

Christmas Card Countdown

October 14, 2008

Here are a bunch of Christmas Cards I have made over the last few days.

This one was made for the Tuesday Crafty Secret Forum challenge over at Splitcoast Stampers. Today's host is the ever talented Darlene. Darlene has challenged us to make our own Designer Paper using Crafty Secret stamps. Card I made uses the small and medium snowflake stamps from the Vintage Christmas stamp collection of Crafty Secrets Clear Art stamps. This was stamped randomly on a white cs with Certainly Celery, Aqua and Peacock ink. Added some bling to the center of the snowflakes. Background paper was matted onto a blue then green cs. Added some dots on the edges with a white opaque Inkssential pen. Layed 3 rows of ribbon across the card then mounted the image taken from the Christmas Images & Journal Notes pad also from Crafty Secrets. Final touch to this card was a Snowflake embellishment.
Stamp: Vintage Christmas Clear Art Stamps from Crafty Secrets
Paper: white cs and image taken from the Images and Journal Notes
Ink: Certainly Celery, Aqua and Peacock ink
Accessories: bling, ribbon and snowflake embellishment


Here are 2 cards also using images from the Christmas Images & Journal Notes from Crafty Secrets.

Monday 13 October 2008

Look Who's Turning...2

October 13, 2008

Here is a card I made for the Technique Lover's Challenge over at Splitcoast Stampers. Today's technique challenge is a Stair Step/Accordion Card.

I have never tried making a card using this technique and when I saw the challenge this morning, I new that the Birthday Kids Stamp Collection from Crafty Secrets Clear Art Stamp would be the perfect stamp set to use. I stamped all the images on white cs with Black Soot Distress Ink. Then colored the images with various copic markers to match the colors on the background DP I would be using. When I finished coloring the images I cut them all up with scissors. Then I got a 10.5 x 5" white cs and scored it at 1.25, 2.5, 4.25, 6 and 8.25. Then folded the score line in an accordion fold. I cut out the blue DP from the Cupcake paper pad of Basic Grey and glued it to the various layers of the accordion fold. Then I cut different patterns from the same paper pad and glued it on top of the blue DP letting 1/8th of an inch showing. The I proceeded to glue on the different parts of my Birthday scene. I attached the balloons to a flexible wire with tape and attached it to the last layer of the accordion fold. I stamped the sentiment on the green DP again from the same paper pad, added red brads to the 2 ends and glued it on to chipboard and attached it to the first accordion fold of the card.

Wow, this really took a long time to make and it is a good thing that it is Thanksgiving Holiday here in Canada. I love the way this card turned out and the picture does not really do it justice. I still have to learn how to take pictures with my daughter's camera. That is why most of my cards are scanned and I tend to stay away from projects that require the use of the camera.

For all Canadians, Happy Thanksgiving. Hope you all are enjoy time off and spending it with Family. Just a soon as I finish with this post, I am off to making our Thanksgiving dinner.

Stamps: Birthday Kids Crafty Secrets Clear Art Stamps
Ink: Black Soot Distress Ink and various Copic markers
Paper: Cupcake from BasicGrey and white cs
Accessories: Red brads, chipboard and wire

Sunday 12 October 2008

Beauty

October 12, 2008

Here is a card for the Featured Stampers challenge over at Splicoast Stampers. Today's featured stamper is Anne Ryan. You just have to go to her gallery, Anne does amazing work and she is such a sweet Lady and leave lovely comments on your creations.

This is the card I have selected from Anne's gallery for this challenge.

For this card I stamped the collage image from Great Impressions on the back of my BG paper from Bo-Bunny's Midnight Diamonds. I colored part of the image in Burgandy with a Tombow marker to give a contrast color. Then mounted the image on burgandy then black cs. I used the main side of the DP for the background of my card. Tied a black ribbon across the top portion of the card, then mounted the stamped image to the left of the card. On the bottom right portion of the card I added some Prima flowers in deep red and pink and attached it to the card with a black brad. Added some fern leaves around the flower which I punch in black cs. Just wanted to keep the colors on this card with White, black and deep red (burgandy). The background paper was again mounted on burgandy and then the black cs base of the card.

Stamp: Great Impression
Ink: Onyx Black Versafine, and Burgandy Tombow marker
Paper: Midnight Diamonds by Bo-Bunny, black and burgandy cs
Accessories: Ribbon, Pima flowers and brad

Saturday 11 October 2008

I Love You Inspsired

October 11, 2008

Here is a card for the Inspiration Challenge over at Splitcoast Gallery. We are to get inspiration from the web site of Muzue Hirano a Japanese Artist.

For this card I used the Stamp-a-jig to stamp the image of Nine Hearts all over the card. This was stamped with Rose Romance Pigment Ink from Stampin Up. Then I distressed the edges with Daffodil Color Box Ink and swooshed randomly across the card for the yellow coloring to the card. I also randomly selected some of the hearts and used a light yellow Tombow marker to color it in. I stamped the sentiment on a round white cs in Onyx Black Versafine and again distressed the edges with Daffodil ink and Rose Romance. This was mounted on to a rose round scallop and then glued to the bottom right side of the card. Tied a ribbon just above the sentiment and attached a silver heart to the ribbon. The panel with the stamped heart was then matted with the Rose cs base of my card.

Stamps: Nine Hearts p - A Muse Artstamps
Ink: Rose Romance, Daffodil and Onyx Black Versafine
Paper: white and rose cs
Accessories: Silver Heart, ribbon, round punch and round scallop nestabilities

Friday 10 October 2008

Curious Sleepy Kitten

October 10, 2008

Here is a card I made for the Limited Supply Challenge over at Splitcoast Stampers. Today's challenge is "Rock, Paper and Scissors". For rock I used some bling from Heidi Swapp (clear but I changed it to Blue with Manganese Blue Copic marker). Paper is Kitty Collage from Carolee's Creations. For scissors I used a scalloped edge scissor.

For the main image of the card, I stamped the image of the sleeping kitten on white cs with Walnut Stain Distress Ink. Then I colored the image with various Copic markers. Added a little glitter on the yarn with a clear Spica pen. Then I cut the image and mounted it on the tan colored cs with double sided foam. I distressed the edges of the cs with Walnut Stain. This was mounted on a blue cs. Mounted the DP also on blue cs, then light blue cs for the base of the card. Added a strip of blue cs that was cut on both sides with a scallop scissors. Added some white liquid pearls on the scallops. Then some bling to the upper left side of the centre cs.

Stamps: Sleepy Kitten - Cornish Heritage Farms
Ink: Walnut Distress Ink and various Copic markers
Paper: Kitty Collage from Carolee's Creations
Accessories: Liquid Pearls, Clear Spica pen and bling

Wednesday 8 October 2008

Christmas

October 8, 2008

Wow, Christmas is just a few months away and I have not really been concentrating on making all those Christmas Cards I will be needing this year.

For today's sketch challenge over at Splitcoast Stampers I have made a Christmas card. This card was made using stamps from the Holiday Calligraphies stamp set from Clearly Inspired by Paper Inspirations. Stamped the flowers on white cs 2x with Jet Black Impress Ink. Colored the image with Cadmium Red and New Leaf Copic markers. For the first stamped image I cut out just the flowers and glued it on top of the flowers from the second stamped image. I coated it with Clear Liquid Embossing from All Night Media and let it dry thoroughly. After it was dried, I cut all around the whole image. Stamped the sentiment on beige cs with Onyx Black Versafine ink and distressed the edges with Black Soot. Added a ribbon off to the right side and adhered the flower image with double sided foam to pop it up. This was then mounted on to Christmas designer paper, not sure who the manufacturer is. Looks like the paper is from the same place and one of them has a sticker with St. Nick 12x12 Vintage Snowflake. This was then attached to the based of my card.


Stamp: Holiday Calligraphies from Clearly Inspired by Paper Inspirations
Paper: white and black cs and Christmas DP St. Nick 12x12 Vintage Snowflake
Ink: Black Soot, Jet Black Impress ink, Onyx Black Versafine and Copic markers
Accessories: Ribbon and Clear Liquid Embossing

Tuesday 7 October 2008

Welcome to Spooksville

October 7, 2008

Cannot believe that Halloween is just around the corner. In a few weeks all those witches and goblins will be roaming around the street, knocking at our homes to beg for treats. Here is a card in keeping with the Halloween spirit, made for the Crafty Secrets challenge over in the Splitcoast forum. Every Tuesday, one of the ladies posts a challenge. Do go check it out, we have so much fun.

Today's challenge is to use chipboard in our project. Background paper for this card is from Cosmo Crickets Haunted: Them Bones, which was glued to the base of the card. Used some chipboard from the Sweet Chips - House - chipboard from Crafty Secrets. Painted the frame of the window with Apricot Copic markers and then added orange peel stickles. When the stickle dried, I cut some spider web ribbon and adhered it to the back of the window frame chipboard to make curtains. Cut out the image of the 2 pumkins from the Heeartwarming Vintage Cuts from Crafty Secrets and adhered it to the black cs background of the window. Cut out the "Welcome to Spooksville" from the same image and adhered it to the top of the window frame. This was all mounted to the background paper of the card.

Ink: Apricot Copic markers
Paper: Haunted: Them Bones from Cosmo Cricket and Halloween Time Vintage Cuts
Accessories: Orange Peel Stickles and spider web ribbon from Michaels

Sunday 5 October 2008

Congratulations

October 5, 2008

Wow, I cannot believe that I have not posted anything in a long time. I have been really busy at work that by the time I come home, I have not energy left and have not been feeling too creative.

However, I can not pass on a featured stampers challenge. Today's featured stamper over at Splitcoast gallery is Love Stampin!!!!!! Boy what a great gallery. You should check it out here. Here is the card I made for this challenge.

First I embossed a 5-1/4 x 5-1/4" white cs with 2 embossing folders from Cuttlebug. Set this aside for awhile. Then I stamped the 'congratulations' (from the Cherish stamp set of Crafty Secrets Clear art stamps) on white cs with versamark and heat embossed it with gold embossing powder. I also stamped and embossed the flowers and the leaves the same war. Used an oval coluzzle and cut around the sentiment. Cut a second oval one size up. Inked the edges of the ovals with a gold metallic pen. Cut an oval scalloped gold paper with an oval scallop nestabilities from Spellbinders. Glued a white ribbon between the 2 embossed designs and layered the pieces on the embossed portion. Matted this to a gold paper and then onto the white based of the card. Added gold liquid pearls to each of the dots on the swiss dots embossed portion.

Stamps: Cherish - Crafty Secrets, Garden Delight - Inkadinkado
Paper: white cs and gold paper
Ink: Versamark and gold mettalic gel pen
Accessories: white ribbon, gold embossing powder, Cuttlebug embossing forlder, gold liquid pearl